Showing posts with label Avon. Show all posts

Sunday, May 5, 2013

Nail Polish Challenge Week 31: The Final Challenge!

It's the very last challenge!
    I feel so accomplished! I actually completed 31 weeks of this! On one hand I am proud of myself for actually sticking to this and doing it every single week. I'm also happy that it is finally over so that from now on I can do whatever I want without having to stick to a theme, but on the other hand I'm a little sad to see it all end. I've devoted half a year to this little project so it has kind of become a routine for me and it has also challenged me and improved my nail art skills by a marginal bit. Oh, my conflicted feelings... But all things must come to an end. So for this final nail challenge the theme is to re-create your favorite challenge! Honestly, I don't have a favorite theme although I do have a favorite nail design. (*cough* My cityscape nails for artwork week *cough*) Instead I chose to do a mixture of re-doing both gradient week (that was a fail of epic proportions) and tutorial week (since I rushed through that one). Without further ado here is the final nail challenge...
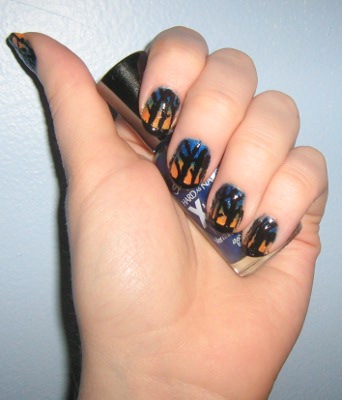
Ombre Sunset Forest Nails
    I followed SimpleNailArtDesigns's tutorial on Youtube to create this. For the base coat for the gradient to stick to I just used one coat of Zoya's Bela. Then on a make-up sponge I used Sally Hansen's Xtreme Wear Hard As Nails in Blue It, Avon's Orange Creamsicle, and Avon's Sunshine. I just dabbed my nail to create the ombre. Then with a toothpick dipped in China Glaze's Liquid Leather I patiently added the ground and trees. Finally I just sealed it all in with my trust NYC Long Wearing Extra Shiny Top Coat. Viola! Tutorial completed! That finishes the final nail polish challenge. I might put together a collective post of every single week just like a re-cap. It will depend on how much free time I have. Anyways it has been an interesting and fun ride and I thank you all for sticking with me. I suggest you guys try this out. Obviously I have no nail art skills at all, but doing this challenge has really shown me new and creative designs that even I can do. You would be surprised at how easy some things are. Thanks again for everything guys!

Wednesday, May 1, 2013

Nail Polish Challenge Week 30: A Tutorial

Only one week left of the nail polish challenge!
     Hey everyone. I know that I am two days late posting this, but I have had to work overtime all this week and so things got a little crazy there. Nevertheless I have finished this week's challenge. This week's challenge was a tutorial. I decided to do Bubzbeauty's spring time nails. I wish I would have slowed down and taken my time a bit more when doing this, but as I said I had worked overtime yesterday and I was hurrying to get it done before dinner. Still I'm happy with the results...
Spring time grass and daisies.
      For the sky which is also the base coat I used Zoya's Blu in two coats, then for the grass strands I used two different greens/ With a toothpick dipped in polish I used Zoya's Josie, and Apple. This picture does not justice whatsoever to the glitter in Apple. It actually has a three dimensional effect because I used one matte color for the stalks and then a glitter for the other stalks. So it sparkles in certain light. Then for the daisies I just used a bobby pin and dotted it in my cheap dollar store nail striper in white. For the center of the daisies I used Avon's Sunshine and just dipped my bobby pin in. This was super simple to create and it would have looked way better had I slowed down and taken my time with it. This is a really great look for springtime and trust me on the nails it looks way more forgiving then this harsh picture. Can you believe we only have one more challenge left? I feel like crying... not sure if I'm happy or sad that it is all about to end next Monday. I will still post some manicure looks, but they will be sporadically and in no particular theme really. Just the nails that I believe are worth taking a picture of. Anyways that's all for this week's challenge. Please look forward next week for the finale. Also later today when I get off work I will be posting this month's CBV review so stick around for that. Bye guys!

Monday, April 8, 2013

Nail Polish Challenge Week 27: Artwork

It's nail polish challenge Monday!
     Hello again all my beauties! Despite my usual hatred for Mondays in general, today has been a very good and productive day for me today. I woke up early and found out my CBV order that I placed during a busy sale last week should be here by Wednesday. That is a week and a half turn around time and let me tell you I ordered quite a few scent shots. So I was very happy with that. Another thing that has made today great is that spring has finally arrived here in my hometown. Yesterday it was up in the seventies and today it has been in the sixties with the sun shining. I have been waiting for spring since Christmas ended.  An another note I was really nervous about what to do for this week's nail polish challenge because if you haven't already noticed my nail art skills are still in the beginner's level. I scoured the net for pictures of nails that are artwork inspired just looking for something that would be possible for me to even attempt at doing. Luckily I found a cutepolish tutorial on Youtube and it didn't turn out too bad if I do say so myself. Without further ado here is how it turned out...
Not too shabby if I do say so myself.
     After searching awhile I saw this City Skyline tutorial and it reminded me of all the landscape paintings I have seen depicting the New York skyline. It was perfect for this week's theme. For a base coat I used only one sheer coat of Zoya's Bela just to give the gradient polishes something to stick to. Then I with a make-up sponge I used Sally Hansen's X-treme Hard As Nails polishes in Blue It and Deep Purple. I sponged the two over my base coat to create the gradient effect of the night sky. Then using my China Glaze Liquid Leather I created the buildings by using short downward strokes. I then used my LA Colors Art Deco nail striper in black to add little satelites and pyramid tops to a couple of the buildings. With a toothpick dipped in Avon's Sunshine I added little windows in the buildings to create the lights of the city. Next I just used my cheap dollar store white nail striper to create a tiny crescent moon on my middle finger and a tiny airplane on my thumb (which sadly you cannot really see). To top it all off I just used my NYC Long Wearing Extra Shiny Top Coat to seal it all in and add some shine. I would say this is probably my favorite look I have done so far in the nail polish challenge. It is so hard to believe we are already at week 27! Look forward next week for the next nail polish challenge. Until then see you next time!

Sunday, March 3, 2013

Nail Polish Challenge Week 22: Inspired By A Song!

This week's theme is music inspired.
      Welcome back everyone for yet another week of me attempting to make my way through the 31 week nail polish challenge. We are on week 22 already and I feel like I'm so close to the end, but I'm underestimating the number of weeks left. Despite the Gagnam Style GIF I did not choose that song for the inspiration of my nails this week. Instead the song I chose was "Honeybee" by Blake Shelton. Yes, I chose a country song which was really surprising to me. Not that I don't like country music, just that I tend to listen to other genres a bit more than that one. However I have been listening to Honeybee over and over for a while now so I thought what better song to chose than this one? So that was the inspiration behind the nails below...
My hand looks kind of freaky here lol...
     For the base coat I used the same color as I used last week and that was Zoya's Breezi in two coats. Then for the bee trail and wings I just used my LA Colors Art Deco Striper in Black. For the body of the bee I used Avon's Sunshine. For the white on the wings I just used my cheap dollar store white nail striper that has no name. And that's all it took other than an hour of free time to create this. I'm happy with how it came out, but there were a lot of things I could have done to make this better. For one, instead of using my gloppy black striper I could have used the end of a bobby pin to make the dots smaller and cleaner looking. The other thing I could have done was use a more pastel blue to make it look more like the sky. I could have even added some fluffy clouds on the more empty looking nails. But alas I was in a time crunch and didn't want to put too much into it since I had to make dinner and do laundry which was sure to strip off all my hard work. The design was really simple I just followed the Bubzbeauty bumblebee nail art tutorial on Youtube. I found it really easy to follow along with in case you were interested. Well that's all for this week's post. Please look forward to more CBV posts and FCS Spring line haul and review soon. Bye guys!

Monday, February 18, 2013

Nail Polish Challenge Week 20: Water Marbled!

Yay! Work is finally over!!
      Happy Monday everyone! I know it's kind of an oxymoron isn't it? But today didn't drag on for me like most Monday's do. I think it's because I only got about two and a half hours of sleep last night and I'm running on pure adrenaline and green tea right now. The theme for this week's nail polish challenge is water marble and I have to say I was not looking forward to this one too much because it seemed a little daunting and I knew it was going to be time consuming. Still its always good to try something out of our comfort zones right? So this is how it all turned out. 

Yet another addition to the #failnails collection...
      As you can see my instincts turned out to be dead on. This was a total disaster!! The Youtube videos make it looks so easy, but if you are like me and have no hand eye cordination, and are prone to spilling things, this is a total nail nightmare. Let me tell you how this all went wrong. First thing that failed was that the white base coat I put on turned super streaky and thus making my white nail polish completely useless. So I had to substitute a lighter base color. So I decided to go with my China Glaze For Audrey. The next thing to go wrong was the fact that the water you use has to be EXACTLY room temperature otherwise the polish will not spread; so I had to wait for it to round out. Then it turns out my Zoya nail polishes that I originally wanted to use, do not work for water marbling. So that took out half my nail polish color choices. In the end I ended up just using my cheapo Avon polishes in Sunshine and Viva Pink. So here is where my lack of grace turned out to be water marble kyrptonite.You have to work quickly with the polishes otherwise they will dry on the surface. And the polish dries within about 30 seconds. So in my haste to try and put the drops of polish in then make a design with a toothpick then dip my nail in the water I ended up spilling globs of polish all over my dresser. Ugh... I ended up getting so frustrated with the process that I called it quits with just one hand and left my other one blank. After posting this I'm going to remove these fail nails pronto! Still while this was a complete mess to do I'm glad I tried something new although I think it's safe to say I wont be doing much water marbling in the future lol!

Monday, February 11, 2013

Nail Polish Challenge Week 19: Galaxies!

It's Galaxy Nail Week!
           Hey everyone! I'm back for this weeks nails challenge and the theme as you could already tell is Galaxies! Galaxy nails are really pretty, but I have to say a little tedious. This was my first attempt at trying galaxy nails and I'm pretty happy with the results. I just wish my glitter would show up in the pictures. I need a new camera... Anyways here is how it all turned out.
        For the base coat instead of using a matte black like most people I decided to use my China Glaze Smoke And Ashes polish from the Hunger Games Collection. I like that it looks mostly black but when you see it up close and in person you see these tiny micro-flecks of green and teal glitter. With a small torn off piece of a make-up sponge I first used Avon's French Tip White and then layered on Avon's Sunshine followed by Avon's Viva Pink to create the galaxy gradient. After it had fully dried I added on Pure Ice's Don't You Wish which is just a clear coat that has lots of really fine raibow colored micro-glitter in it. I wish you could see the glitter in the pictures because it really adds that pop effect when the light hits it and makes it look like stars. 
\And another view...
       In the end I am really satsified with how it all turned out. I was honestly expecting a huge mess, but it wasn't that bad or that hard to create. I have a feeling when this nail polish challenge is over I will be wearing a lot of galaxy nails, playing with different colors and glitters. Anywho that's it for this week's nail polish challenge. I hope you enjoyed it and look forward next Monday for the next one. Bye guys!

Monday, January 7, 2013

Nail Polish Challenge Week 14: Flowers!

Keeping up with New Year's Resolutions still?
      Happy Monday everybody! The first week of the year has officially ended. Are you guys still sticking to those New Year's resolutions? I know I've been excercising every day of the week so far and I can already tell that my flexibility is getting better. I can do lunges now much better than before so hurray for progress! Let's hope I can keep the motivation going though. Anyways the theme for this week's nail polish challenge is flowers!
I tried for Daisies.
       So for flowers I wanted to do something a little bit different and tried to go for something like Daisies although they look more abstract than I had wanted I am happy with them. It was my first time doing something like this on my own. For the base color I used two coats of China Glaze's For Audrey and for the yellow center's I used Avon's Sunshine, then for the petals I just used a cheap dollar store white nail striper that has no name, and as usual I topped it all off with my trusty NYC Long Wearing Super Shiny Top Coat. That's it for this week's nail polish challenge. I don't know if Blogger is being buggy or if it has a really glitchy update or what, but for some reason it won't let me upload pictures straight from my computer anymore. I had to upload them on Photobucket and then paste the url link to get them. Am I the only one having this problem? Whatever it is I hope it works itself out and goes back to the simpler way it was before. Please look forward to next week's post!

Tuesday, January 1, 2013

Nail Polish Challenge Week 13: Animal Print!

Happy New Year!!
          It's New Year's Day everyone! Got any big plans for the day? My plans just include getting organized to help me ring in the New Year. I have a ton of resolutions for this year, well not a TON, but I have a few. Some of which is that I plan to read at least 25 books, try 100 new Candles By Victoria fragrances, lose a little bit of weight, and of course to complete this nail polish challenge. I can't believe I've been doing this for 13 weeks already! That sounds crazy to me, but doing this challenge has forced me to try things I probably wouldn't have before and what better way then to bring in the New Year than with something I've never tried, nor had the guts to try before, and that animal print nails!
Funky Zebra Nails!
      So I tried to do a Zebra like pattern, but I thought a white background was too boring to put it on so I used Viva Pink from Avon. Which in turn kind of doesn't make it look like zebra prints, but just a funky pattern lol! Oh well it turned out better than I expected because the Art Deco Striper I used to create the black lines was startin to get really thick and goopy, making it hard for me to draw the thin lines that I wanted. But eh, I still like it. It isn't like any other type of nails that I've done before so I'm glad that I tried something new and on what better day then New Year's right? Anyways I'll be posting my January CBV monthly review in just a bit so please stick around for that! Happy New Year's guys!!

Monday, December 24, 2012

Nail Polish Challenge Week 12: Stripes!

It's Christmas Eve!!
            Welcome back everybody! Tomorrow is Christmas and I'm so excited. I've spent most of my weekend cleaning and baking my traditional Christmas cookies and Rice Krispy Treats that I give to all of my family members as an extra present. So in honor of this week being Christmas and the fact that the theme for this week is stripes I decided to try my hand at candy cane nails.
Such a shame you can't see the glitter!
        I used 2 coats of Avon's Ruby Slipper as a base which is a really pretty and glittery red and then I just took my cheap dollar store white nail polish striper and made thick side-ways stripes for that twisty candy cane effect. Then as always I sealed it all in with my trusty NYC Long Wearing Extra Shiny Top Coat. I just want to wish you all a very Merry Christmas! I hope you all stay safe and enjoy your holidays. See you guys on New Year's Eve!

Monday, December 10, 2012

Nail Polish Challenge Week 10: Gradient!

You there! Come on!
           Welcome back internet. We are on week 10 already and we've started to get into the more challenging nail art. I have never done a nail gradient before so this was my first attempt. I'm not all that happy with the results but what the heck I did my best and you have to have a starting point somewhere right? So doing these nails was a complete mess because first off my make-up sponge kept absorbing all the nail polish before I could pat it onto my nails so in the end I gave up and just used a Q-tip to make the gradient effect instead.
My sad attempt at a pink gradient...


Closer look at my #FailNails.
     So I know it is kind of hard to see the gradient effect but there is actually three different polishes that I used. The first one (which is closest to the nail bed) is a pale cream pink called Bella from Zoya. The middle color is a glittery darker light pink from Sally Hansen Diamond Nails in Pink Promise. And the tip color is Avon's Viva Pink. I was really hoping I could do better than this but after trying and re-painting my nails twice I finally conceeded that this wasn't too bad for a first shot. Anyways that's all for this week's challenge. Next week's doesn't look to hard so the results should be better then. Tune in for next Monday's challenge. Until then guys!

Monday, December 3, 2012

Nail Polish Challenge Week 9: Rainbow!

It's rainbow week!!
           Hello again internet! This week's theme is rainbow! I was actually looking for a little something different than the usual rainbow nails so I decided to go with a bold primary colored focused rainbow nails. The colors kind of reminded me more of school paints for some reason. Maybe I'm just weird lol. Anyways here is how they turned out.
You can't really see the glitter on the red polish.

Some polishes look brighter in different light.
           On my thumbs is Zoya's Holly in two coats, on my index finges is Avon's Blue Shock in three coats (the formula is REALLY sheer), on my middle fingers is Avon's Ruby Slipper (it is actually a really pretty red glitter but you can't tell from the lighting in the pictures.), on my ring fingers is Avon's Orange Creamsicle, and last but not least on my pinkys is Avon's Sunshine. All of them are topped of with my NYC Long Wearing Extra Shiny Top Coat. Sorry the pictures aren't that great, but I made the mistake of painting my nails before going Christmas shopping so I took the pictures in haste before I went out which is why the lighting is so terrible. Just got my secret santa gift so I will have that post up for you soon. Hope you all have a happy Monday. Until next time guys!

Monday, October 15, 2012

Nail Polish Challenge Week 2: Orange

Happy Monday Everyone.
      So it's week two of the 31 Week Nail Polish challenge and the theme for this week is Orange. With it being October it was kind of the perfect week for this color. So I decided to try and get creative with my black striper and make little Jack-O-Lanterns. I've never tried this before which may be pretty obvious since they aren't the neatest. Still at least I tried. I actually painted these Friday night and I took this picture today so they have held up pretty well especially when you take into consideration that I am not gentle on my nails at all and I had a very busy weekend. The colors I used are Avon's Nailwear Pro in Orange Creamsicle and L.A. Colors Art Deco in Black and I just topped it off with NYC Long Wearing Extra Shiny Top Coat. 
Yes, those are my real nails btw.
     Only one picture this time because I had a busy day at work and only had time to take this picture. Next week's theme is yellow which is a tiny problem since I do not currently own a yellow nail polish, but I'm planning on picking one up this weekend. If not I'm sure I can scrouge up a gold polish somewhere. LOL. I'm currently still reeling from The Walking Dead's season premier and I also am waiting in anticipation for Wednesday night when American Horror Story starts back up again. I'm so happy Evan Peters is back for another season. I miss seeing him go crazy. And now it will be even more fitting since this year's theme is Asylum after all. Well that's it for this little post. Please check back in frequently for more. I have a few Halloween themed posts coming up soon too! Until next time guys!
American Horror Story Premier this Wednesday on FX!